Getting Started With Epock
Installation
We recommend to use the binary packages available for Mac OS and Linux that can be downloaded in Epock’s download section.
From binaries
Binary packages include Epock’s binary, the Tcl plugin for VMD, and Python scripts to easily plot Epock outputs. Here is the content of a typical tarball:
epock-1.0.0rc-Darwin-i386/
├── INSTALL
├── README
├── bin
│   └── epock
└── share
    └── epock
        ├── plugins
        │   └── vmd
        │       └── epock1.0
        │           ├── epock.tcl
        │           ├── epock_gui.tcl
        │           ├── epock_results_dynamic_window.tcl
        │           ├── epock_results_window.tcl
        │           ├── graph_radius.tcl
        │           ├── pkgIndex.tcl
        │           ├── run_tk.tcl
        │           └── table.tcl
        └── scripts
            ├── plot.py
            ├── plot_contribution.py
            └── plot_profile.py
We recommend to put the Epock binary in a directory already present in your
$PATH, while the VMD plugin and the python script should be in some
shared directory.
As an example, to install Epock in /usr/local, just type the following commands:
$ tar xf epock-1.0.0rc-Darwin-i386.tar.gz
$ sudo mv epock-1.0.0rc-Darwin-i386/bin/epock /usr/local/bin/
$ sudo mv epock-1.0.0rc-Darwin-i386/share/epock /usr/local/share/
The next step is to make the VMD plugin accessible from inside VMD. This step is common to all installation procedures and is detailed in the Installing the VMD plugin section.
From sources
To compile Epock from source code, the following packages are required
The procedure is then quite straight forward:
$ tar xf epock-1.0.0rc.tar.gz
$ cd epock-1.0.0rc
$ mkdir build
$ cd build
$ cmake ..
$ make
$ sudo make install
If you have any difficulty compiling Epock, please contact the developer team.
The next step is to make the VMD plugin accessible from inside VMD. This step is common to all installation procedures and is detailed in the Installing the VMD plugin section.
For more information, please refer to the extended compilation guide.
Installing the VMD plugin
After copying the Epock plugin to the right directory (see above),
you have to add these lines in your $HOME/.vmdrc file.
set auto_path [linsert $auto_path 0 "/path/to/directory/share/epock/plugins/vmd"]
vmd_install_extension epock epock_tk "Analysis/Epock"
Special note: installation from binary package.
If you installed epock from a binary package in a directory that is not
in your $PATH, you may want to change the epock executable
path directly in the VMD plugin.
This can be done by modifying the value of ::epock::exec_path
in epock_gui.tcl (line 47).
Quick Start
The configuration file
Principle
Here is an example of a simple configuration file:
[DEFAULT]
grid_spacing = 0.5
contribution = residue
contiguous = true
contiguous_cutoff = 4.0

[pock1]
include_sphere         =     1.90    26.70   -21.91   8.0
exclude_sphere         =    10.26    25.14   -20.03   6.0
contiguous_seed_sphere =     1.90    26.70   -21.91   4.0

[pock2]
include_sphere         =    -0.14     5.56   -20.79   8.0
exclude_sphere         =     3.69    12.71   -19.56   6.0
exclude_sphere         =    10.55    -1.65   -20.54   6.0
contiguous_seed_sphere =    -0.14     5.56   -20.79   4.0
Detailed information about the parameters can be found in the section devoted to configuration files.
For the definition of the pocket Maximum Englobing Region (MER), it is very intuitive to use coordinates that are centers of mass of atom selections. Thus, the configuration file can be written by hand or using any homemade script - but the VMD plugin will show itself particularly useful for this purpose.
Using the VMD plugin to generate the configuration file
After installing the VMD plugin, you will be able to launch it through Extension -> Analysis -> Epock.
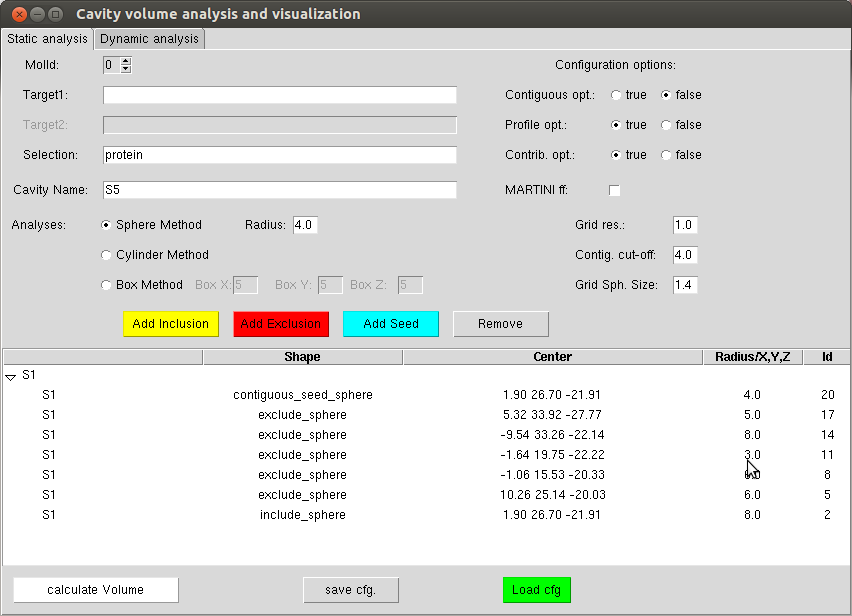
Overview of the VMD plugin GUI.
For each cavity defined by a name (givem in the “Cavity Name” entry), it is possible to create inclusion, exclusion and seed shapes using respectively the “Add inclusion”, “Add Exclusion”, “Add Seed” buttons. If a shape is not well positioned, the user can remove it using the “Remove button”. It is also possible to graphically hide a shape by double-clicking on the corresponding line in the window. The interest of this approach is that you can see the result in the VMD OpenGL window to correctly position the starting grid.
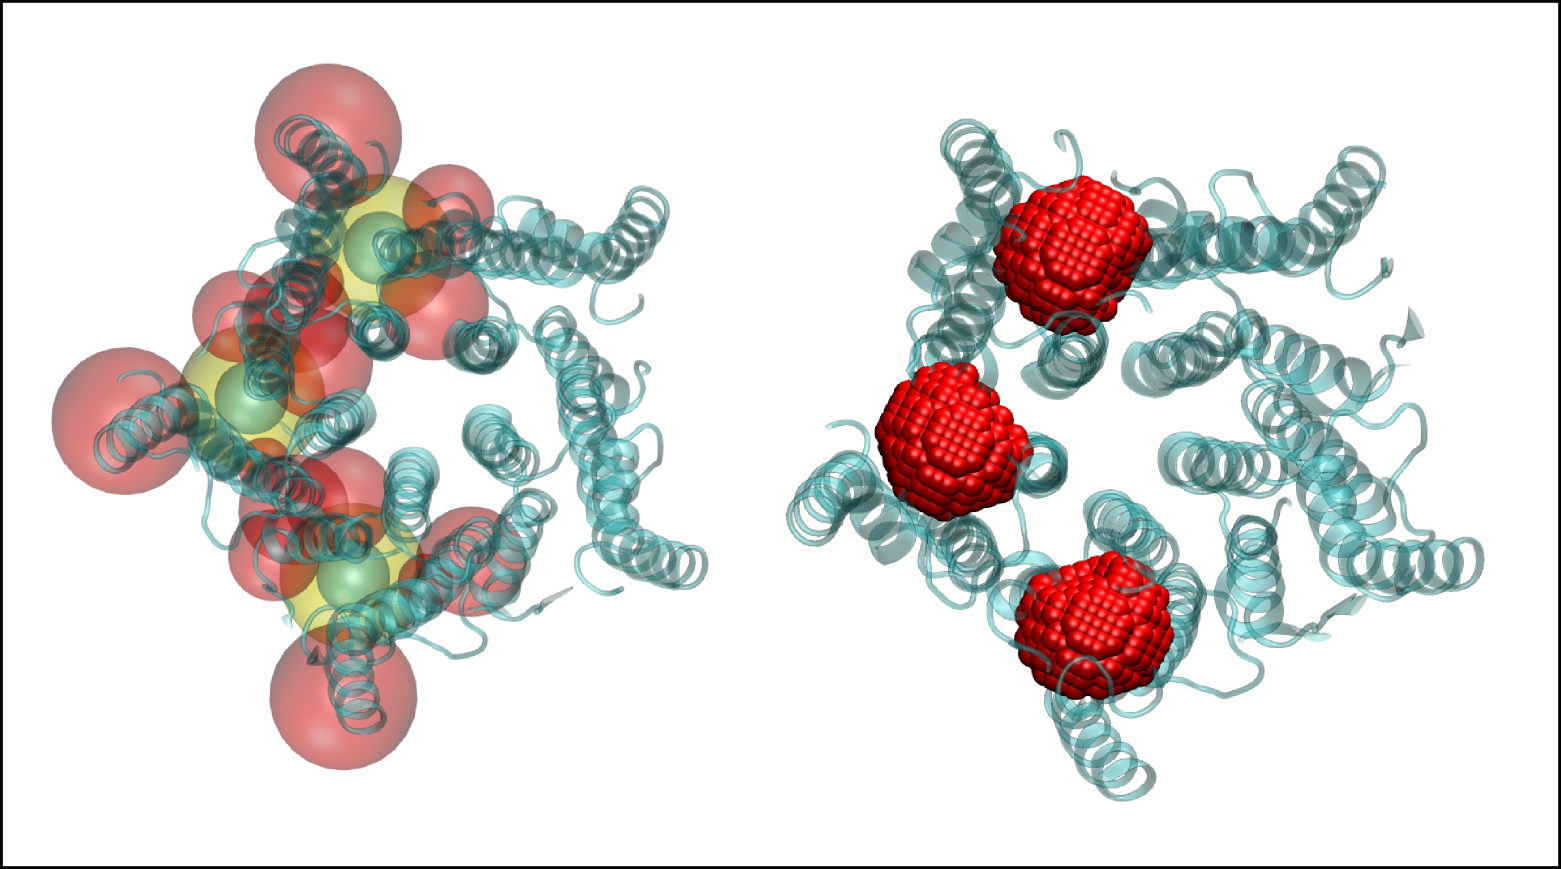
Defining the MER using Epock’s VMD plugin. Left: each MER is the combination of inclusion (yellow) and exclusion shapes (red); Contiguous points seeds are shown in cyan (see Non-contiguous Points). Right: The resulting grid points after combination of the shapes by Epock.
The configuration file can then be saved via the “save cfg.” button (and re-loaded later using the “Load cfg” button).
Epock trajectory formats and conversion
One of Epock main purposes is to efficiently calculate pocket volume along MD trajectory. The input trajectory format can be of crucial importance when it comes to performances.
Importantly, Epock can be used as a VMD plugin (see section “Using the VMD plugin”). As VMD can read numerous trajectory formats, including Gromacs xtc and NAMD dcd file format among others, one could run Epock using its dedicated VMD plugin to benefit VMD I/O capacities.
Epock command-line tool reads Gromacs xtc (and trr) trajectory files. We chose this file format for several reasons.
The xtc format is Gromacs standard file format for trajectories. Hence, the Gromacs users community is very used to this format.
This format nicely compresses floating point numbers, which makes its storage more than three times lighter than in the equivalent NAMD dcd file format. Hence, our humble opinion is that NAMD users should probably convert their dcd trajectories to the Gromacs xtc format, saving terabytes of storage with meaningless loss of precision.
Numerous tools and libraries that can convert MD trajectory formats have been
successfully developed over years.
For instance, Gromacs trjconv tool as well as the mdanalysis library can convert many input formats
to as numerous output formats (see for example mdanalysis dcd2xtc.py script).
Notably, these tools can also filter, centre, fit, deal with periodic boundary
conditions, etc. on the fly, which make them choice pretreatment tools.
Conversion with Gromacs trjconv
This will require the Gromacs software suite and the VMD program to be properly installed.
$ # First, we have to set the VMD_PLUGIN_PATH environment variable to
$ # the molfile folder within the VMD installation
$ export VMD_PLUGIN_PATH=/path/to/vmd/plugins/MACOSXX86/molfile
$ # Now run the trjconv utility
$ trjconv -f traj.dcd -o traj.xtc
Conversion with mdanalysis dcd2xtc
This solution will require a proper installation of mdanalysis, which has several dependencies.
The example available on the mdanalysis website is not aimed to run on input
trajectories.
To convert your own trajectories, you will require this modified version of dcd2xtc.py that takes input and output files
as arguments.
$ # In this case, we will also need a topology file i.e. a PDB or PSF file.
$ python dcd2xtc.py -s top.pdb -f traj.dcd -o traj_mda.xtc
Launching Epock
Using the command-line tool
Full usage instructions for Epock can be displayed running $ epock -h:
$ ./epock -h
epock v1.0.0rc

Calculates the volume of cavities along a trajectory.

usage: epock [options] -s coor.pdb -c conf.cfg

File I/O:
---------
  -s          Input          Coordinate file (pdb format)
  -c          Input          Configuration file
  -f          Input, Opt     Trajectory file (gromacs xtc format)
  -o          Output, Opt    Volume output file (default: volume.dat)

Options:
--------
  -b                   First frame (ps) to read from trajectory
  -e                   Last frame (ps) to read from trajectory
  --ox                 Output cavity trajectory file (default: no)
  --dt <timestep>      Only use frame when t MOD dt = first time (ps)
  --martini            Use martini vdW radii i.e. 4.7 for beads and 2.1 for probe
  --mol                Calculate volume of a molecule instead of a cavity
  --radii <filename>   Use custom atom radii
  --dry-run            Stop after basic initialization and write the grid as a PDB file
  -h, --help           Show this message and exit
  --version            Show the version number and exit
  -v                   Enable verbose mode
Epock mandatory arguments consist in the topology file and Epock configuration file (the trajectory file is actually optional since a volume calculation can be performed on a single snapshot).
Typically, to run the calculation on a trajectory and getting the pocket trajectory as output, the command-line argument would be:
$ epock -s conf.pdb -f traj.xtc -c config.cfg --ox
Using the VMD plugin
After defining your grid or loading your configuration file (as detailed above), you can specify to VMD if some atoms should be ignored by defining the selection of interest in the “Selection” field. By default, only protein atoms are considered. We are all set.
To calculate the pocket volume on a static structure, just hit the “calculate Volume” button.
To calculate the pocket volume along a trajectory, switch to the “dynamic analysis” tab. It is then possible to indicate the starting and ending frames of the trajectory as well as the timestep. It is also possible to fit the trajectory. Finally, hit the “calculate Volume” button.
Result Analysis
Text data files can be plotted thanks to VMD or via the dedicated Python scripts freely distributed with Epock.
This part is detailed in the result analysis page